Forum rules
Welcome to the Leverguns.Com General Discussions Forum. This is a high-class place so act respectable. We discuss most anything here other than politics... politely.
Please post political post in the new Politics forum.
I have tasked myself to build a belt pouch for my Dad's Dremel multi-tool (similar to a Gerber or Leatherman multitool) for Chritsmas. He saw the carrier I put together from a Tandy kit for my Gerber multi-tool and wanted something similar.
I've hit two snags: Tandy has no kits that can be made to work and I don't know what to do with the measurements I have from the tool. This is my first "from scratch" leather build.
My biggest issue is how to make sure it has enough "depth" for the tool to fit. The length and width of the rear part is easy but how do I determine how wide the front part needs to be in order to ensure there's enough room for the tool to fit and be removed with a minimum of hassle?
Thanks!
If these walls could talk, I'd listen to the floor.
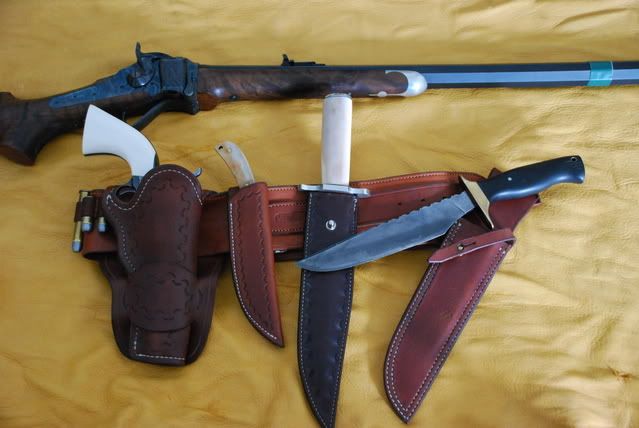
The way that I found works for me is to place graph paper over the object that is to be covered in leather and fold the edges of the paper and trace the area and add a 1/4" for the stitch area. you can play around and make the changes needed. The good news is of you save the template, you will be able to use it again for different projects. Here is a butt cuff I made for my 1894 that holds a 45 ACP mag from a knife template with a few minor changes. Take your time and enjoy. If you need any more help PM me and If it gets too bad, I can help you out with one.
Last edited by Palmtreee on Sun Nov 30, 2008 11:17 am, edited 1 time in total.
I use the big brown shopping bags you used to get at the store. It's heavier than paper, but pliable enough to work with. As stated already, leave some room for your stitch line and edging. Just don't forget to put your snaps and belt loop on the body of the piece before sewing on the front or you'll potentially travel into sailor territory.
Other than the gunbelt, I made all the other leather.
kimwcook wrote:I use the big brown shopping bags you used to get at the store. It's heavier than paper, but pliable enough to work with. As stated already, leave some room for your stitch line and edging. Just don't forget to put yourand belt loop on the body of the piece before sewing on the front or you'll potentially travel into sailor territory.
Other than the gunbelt, I made all the other leather.
Really nice work. Possibly a new line of work after you pull the pin?
Riamh Nar Dhruid O Spairn Lann
- motto on the Irish Regiments' flags
Thanks airedaleman, I've thought about doing leather for some time now. I actually made the knives as well. And, the ivory grips on the Colt. Handstitching everything is a pain and it's not very fast. I'd need to pick up a mucho $ sewing machine. But, I'm still thinking about it. Plus, get back into making knives. I moved a couple of years ago and I need to get a shop built.
kimwcook wrote:Thanks airedaleman, I've thought about doing leather for some time now. I actually made the knives as well. And, the ivory grips on the Colt. Handstitching everything is a pain and it's not very fast. I'd need to pick up a mucho $ sewing machine. But, I'm still thinking about it. Plus, get back into making knives. I moved a couple of years ago and I need to get a shop built.
Where's that darn "jaw-dropping" smiley? The slobbering one too? Dang, that is good work all the way around! I bet you'd get steady work just from this website!
awp101 -
Good luck on this project - sounds like fun. Also sounds like it'd make a great post with step-by-step pictures.
Maybe this is the idea that will get us all through the winter blues - which I am sure will set in oh, right around January 20th. All of us sharing projects and how-to's...
YK that sounds like a good idea. Some howto projects would do fine. When I started shooting black powder in Tenn back in '68 we all made all of our own gear from powder horns,patch knives and all of our leather gear. So there is time for some folks to get to thinking.
JerryB II Corinthians 3:17, Now the Lord is that Spirit: and where the Spirit of the Lord is, there is liberty.
I've got to make a cross draw holster for my FA 83. I'll see about making a tutorial. It'll be the first cross draw I've made. Cross your fingers and hold yer breath.
The green tape is to mark the resonance node of my barrel. Black powder cartridge rifle (BPCR) shooters shooting Sharps modeled rifles have found, debatable subject, that shooting off cross sticks that there's a resonance node located somewhere on your bbl. Alot of them mark that area with something, tape, whatever..and place that mark on the cross sticks for the best accuracy. Placing the forearm on the cross sticks isn't as accurate. Hence, the tape on my bbl.
kimwcook wrote:The green tape is to mark the resonance node of my barrel. Black powder cartridge rifle (BPCR) shooters shooting Sharps modeled rifles have found, debatable subject, that shooting off cross sticks that there's a resonance node located somewhere on your bbl. Alot of them mark that area with something, tape, whatever..and place that mark on the cross sticks for the best accuracy. Placing the forearm on the cross sticks isn't as accurate. Hence, the tape on my bbl.
Now, you know, the rest of the story.
Thank you Mr Harvey! Actually, that's pretty cool since I never knew that!
Ysabel Kid wrote:Must be because it is an environmentally-friendly Sharps!
If these walls could talk, I'd listen to the floor.