Forum rules
Welcome to the Leverguns.Com General Discussions Forum. This is a high-class place so act respectable. We discuss most anything here other than politics... politely.
Please post political post in the new Politics forum.
I'll start by saying I've never had room to set up a proper reloading bench but I'm about to move into a larger place so it's finally going to happen! I have an old solid wood corner desk, it's HEAVY and must be moved in pieces. It's been in storage for years and apparently somewhere along the way I lost the brackets to hold it together. If the brackets dont turn up soon I may have to build my own out of angle iron or aluminum. Aluminum would be easier as I dont have a drill press and would be doing everything with a hand drill.
Not my picture but the main body of the desk is similar to this one. Mine is taller with a shelf about 18" above the main desk, equally heavy and sturdy. It also has a light color plastic covering laminated to the top of the desk and shelf which seems like it'd make cleaning up spills a cinch.
It's roughly 42" along each side but being a corner desk makes it deep but limited it's usable workspace.
So my question is for the time and money should I buy angle and make my own brackets or just build my own bench from scratch? I can see this bench not being ideal as there isn't a long of room left for workspace once the press is mounted, but it's sturdy (it's heavy enough I don't think it'll move even though it wont be wall mounted) and it seems heavy duty enough.
I think if you consider the amount of work you'd be putting into it, you'd be more satisfied in the long run designing something from scratch and building at exactly as you want.
Take your time, look at lots of other people's plans, and combine the features that you feel will work best for your own needs. I found it useful to have all of my presses mounted at once rather than on switchable base-plates, but I have a fairly wide space. I really like a top that is about 4 to 6 inches above the original top, and sticking out a couple more inches towards me. This gives room to actuate press handles fully, cubbies for commonly used tools, and ease of clamping something temporarily if needed.
It's 2025 - "Cutesy Time is OVER....!" [Dan Bongino]
My benches are fastened to the walls and stand on 4x4 legs. They have 3/4" plywood tops and are reinforced with steel plates under the area where the presses sit. I sometimes wonder if they will hold. I'm sure you could get good use out of that bench if you tied it to the wall and/or floor.
M. M. Wright, Sheriff, Green county Arkansas (1860)
Currently living my eternal life.
NRA Life
SASS
ITSASS
Brackets are easy to buy or build.
You can also buy a quick detach setup (Lee sells one) to swap out press, powder measure, lubrisizer, etc. and so forth.
Only you can decide if the bench suits your workspace.
We have an old thread on here showing different people's setups
I need to add photos of mine.
"Make yourself an honest man, and then you may be sure that there is one less scoundrel in the world." - Thomas Carlyle
start with a "floor " plan first. Lay you stuff out on the floor and rearrange to where everything goes and flows smoothly for the space you have. Like putting a puzzle together till it all comes together. move stuff around till you are happy and build a bench to fit. Easy peasy.
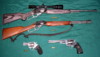
Rossi 92 .357 lever , and a cz pcr 9mm
Henry .22 lever, Remington speedmaster 552 .22 lr
Marlin Glenfield .22 boltaction
gforce 12ga semi
Taylor's Tactical 1911 A1 FS in .45acp
ruger vaquero, 357 magnum
Marlin 336W .30.30
beeman sportsman rs2 dual caliber pellet rifle
henry .22 magnum pumpaction/octagon barrel
stag 5.56 m4 with reddot
I'd save that corner desk for reference books, reloading manuals and the computer ( so you can check in here while loading).
Build yourself a bench, as said, design it how you want it.
My set up uses base cabinets from the old kitchen. Gives me storage, strong plywood boxes to set a plywood top on. At about 7 feet I can keep my lubrisizer, Dillon 550, RCBS single and powder measure on hand all the time as well as the scales. Bigger is better! For my RCBS single stage I made a 1/2" steel plate that I drilled & tapped so short bolts hold the press and the plate is through bolted at the corners increasing the foot print to hold tight.
Back to you question, I think that would work OK. (sounds like you might be using the bench indoors, not in a shop or garage). How long would it take to make brackets an assemble? An hour, mebbe two? Granted, a heavy bench made of 4x4s and 3/4" plywood may be better, but what you have will get you reloading quickly and easily. Personally I prefer a reloading bench higher so I can sit on a bar stool height stool, but others like a chair height seat (I used a Workmate for a few years before I had a dedicated reloading area). I'd say assemble it, and attach it to a wall for extra sturdiness and give it a try. You'll get reloading and if you choose to change your set up later, you'll have an idea what works for you...
Mike
Vocatus atque non vocatus, Deus aderit...
I've learned how to stand on my own two knees...
I've clamped my presses to sturdy wooden kitchen chairs and commenced to make ammo. I've got benches, but over the years have settled on an 18" X 18" 3/4 plywood mounted on a single legged stand (heavy bottom for stability). This allows me to reload in the garage in the winter and inside the house when its 115 degrees outside. That reloading bench in the initial post looks like it will do a fine job. Goodwill is full of reloading benches for cheap.
"Please don't feed the trolls. Just the user name choice should be enough to ignore this guy..."
I think it depends on what you want and the space you have available. I built mine and have over head storage shelves and underneath storage shells and its long enough to occupy the entire leangth of the room and accommodate three stations (Square deal B - quantity, RCBS Rockchucker - precision, and Lyman Turret - convenience).
Took me several years to arrive at this arrangement …… lots of trial and error …… and who knows? In a couple years I might feel compelled to re do it in a different configuration.
Half the fun is figuring it out and trying different solutions. Puzzles easier solved are boring & unfulfilling.
If you've had that desk in storage for years you obviously don't need it for something else, so I'd say use it.
Angle iron brackets will work, use a hand drill and just go carefully.
Set it up right, and there will be a truckload of workspace, depending on how much space you have for yourself around the desk.
Just as a quick example, If you have enough room to work on both sides of the desk, and assuming you are right handed.
Set your press up on the right side straight edge butted up against the front side panel, use the hole in the top of that front side panel as a mounting point for a components tray. I have a single stage press, so I grab the charged case from the loading tray on the left side of the press with my left and the bullet from the right side of the press with my right, stick them together and slide them into the press.
I use one of the old RCBS case trimmers, like a TrimPro, but older. Mount that on a board mounted to the left side straight edge opposite the press, again use the hole in the top of the front panel to mount a case tray. All that space that is in front of you if you sit at the desk normally would now be available for scales, powder throwers, case trays, etc.
Bob
***********************************
You have got to love democracy-
It lets you choose who your dictator is going to be.
***********************************
The picture is to reference the shape, not the actual desk that I have. Mine is solid wood and nearly 2" thick. It is STURDY, I'm unable to connect it to either wall but I don't believe it will move, its a heavy sucker that must be moved disassembled.
I removed the slid-out keyboard holder from under the desk so I have took to add a few layers of plywood or maybe some 2x stock. I'm not sure that it's needed but I may end up doing it just because.
It's not ideal being relegated to a corner but it's 100% more room than I currently have to leave my reloading gear set up.
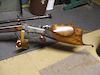
My presses and lubrisizers etc. are mounted to some pieces of aluminum I cut from a long piece I found at the scrap yard. Probably commercial window channel. I seem to recall running it through the table saw to make it 3/4” thick or so. I put four 5/16” Tee nuts in the bottom of the desktop and use socket head screws to hold the tools to the top. Finger tight works. My shelf has a notched board at the back the plates slip under.
You do not have the required permissions to view the files attached to this post.
Loading benches need to be long and narrow so you have plenty of edge to mount various tools, but not depth that makes reaching the back or shelves tough. I'd never go deeper than about 24"-28" as more than that makes for a bench that gets clutter near the walls.
I also like my loading bench taller than normal desk height, as it makes less strain on the user if the height is up around 36"-42" height. That might seem pretty tall if you're sitting, but it's often easier to reload standing, and a bench stool that adjusts for height will always keep you at the perfect height to be comfortable. If I'm not comfortable while reloading, I usually quit pretty quickly.
So I'd almost always build a bench unless I got lucky like I did with mine. I was involved in a remodel at a local bank coin vault and they were hauling these gorgeous metal framed heavy duty benches out to the dumpster. Guys were grabbing them quickly, and I got one too. About 7' long, and with a bottom shelf 12" off the floor. It's got a 1.5" thick wood grain formica top that's super strong. I've been using it since the early 1980's.
For those contemplating building or replacing an existing reloading bench, the National Reloading Manufacturers Association design, instructions, material needed, cut list, etc., maybe of interest. I built two such benches over the years, changing the dimensions to fit the available space. I found it is a very stable design.
The most important aspect of this signature line is that you don't realize it doesn't say anything significant until you are just about done reading it & then it is too late to stop reading it....
Grand Poo Bah WA F.E.S.
In real life may you be the bad butt that you claim to be on social media.