Being a handy guy, not to mention a bit of a cheapskate, I decided to try to make my own Otis cleaning kit. The biggest part of the Otis system is the cable that pulls the patches/brushes through the bore. That's the part I needed to make. The brushes and slotted tips are relatively inexpensive and readily available. (in fact, I have a couple of extras)
To start, we need some tools and materials.
The tools:
These consist of
- a drill with a 9/64 drill bit
- a 8-32 tap
- T-handle
- Electrical pliers (for stripping the cable sheath - a knife would do just as well)
- Small tubing cutters
- A medium nail punch
- Hammer
- You may also find vise grips, a file and some emery cloth handy as well.
The materials:
A couple of close-ups of the tubing:
These consist of:
- 36"-42" of 3/32" vinyl coated steel cable
- 12" of 3/16" thick wall aluminum tubing (3/16" x 0.035")
- I also used some 5 minute epoxy when I inserted the cable into the tubing.
The method:
- Cut two pieces of tubing approximately 1" or so long.
- Set one aside
- Using the drill and the 9/64" drill bit, drill into one end of the tubing approximately 1/2" being careful to drill as straight as possible.
- Take your tap and tap approximately 3/8" or so of #8-32 threads into the drilled end of the tubing.
- Strip approximately 1/2" of sheathing from one end of the cable and 3/4" from the other end
- I mixed some epoxy and lightly coated the short tail (1/2") of the cable and inserted it into the non threaded end of the threaded tubing.
- Stake the tubing into the cable using the nail set and the hammer.
- I then put some epoxy on the 3/4" tail of the cable and slipped it into the untapped piece of tubing.
- Stake the tubing again.
The staking will look something like this:
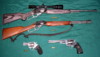
What I wound up with looks like this:
Now just add whatever attachments you want.
The total cost of each "cheapskate cleaning cable" is around $2. The tubing itself was $2.99 at ace hardware and is about 12" long. Cable was $0.34 per foot at Home Depot.
Happy cleaning.
OT - Make your own Otis Kit
Forum rules
Welcome to the Leverguns.Com General Discussions Forum. This is a high-class place so act respectable. We discuss most anything here other than politics... politely.
Please post political post in the new Politics forum.
Welcome to the Leverguns.Com General Discussions Forum. This is a high-class place so act respectable. We discuss most anything here other than politics... politely.
Please post political post in the new Politics forum.
OT - Make your own Otis Kit
You do not have the required permissions to view the files attached to this post.
Last edited by cnjarvis on Thu Nov 19, 2009 10:53 am, edited 1 time in total.
Re: OT - Make your own Otis Kit
that's pretty sharp! I love my Otis kit, and I'll admit I only got it because my wife and I were at Dick's and she was feeling generous 
-
Ysabel Kid

- Moderator
- Posts: 29070
- Joined: Mon Sep 17, 2007 7:10 pm
- Location: South Carolina, USA
- Contact:
Re: OT - Make your own Otis Kit
Very cool! I'm kinda cheap and handy too - I may have to give this a whirl! 

-
Ben_Rumson
- Advanced Levergunner
- Posts: 2569
- Joined: Sat Sep 15, 2007 12:51 pm
Re: OT - Make your own Otis Kit
Sweet! Thanks
"IT IS MY OPINION, AND I AM CORRECT SO DON'T ARGUE, THE 99 SAVAGE IS THE FINEST RIFLE EVER MADE IN AMERICA."
WIL TERRY
WIL TERRY
-
Modoc ED

- Advanced Levergunner
- Posts: 3332
- Joined: Thu Sep 20, 2007 11:17 am
- Location: Northeast CA (Alturas, CA)
Re: OT - Make your own Otis Kit
I totally understand your wanting to make an Otis like tool and a fine job you did.
However, for me, I'd just as soon use one of those new-fangled bore snakes.
However, for me, I'd just as soon use one of those new-fangled bore snakes.
ED

Yer never too old
Yer never too old
Re: OT - Make your own Otis Kit
Thanks guys.
I like bore snakes too and have several but the one for my 223 broke so I just made myself the "otis".
I like bore snakes too and have several but the one for my 223 broke so I just made myself the "otis".
Re: OT - Make your own Otis Kit
I think the 'otis' concept is nice, too - and makes a good 'spare' for a hunting kit, since it isn't 'caliber specific' like the 'snakes'. I use the 'snakes' at home, though.cnjarvis wrote:Thanks guys.
I like bore snakes too and have several but the one for my 223 broke so I just made myself the "otis".
It's 2025 - "Cutesy Time is OVER....!" [Dan Bongino]
Re: OT - Make your own Otis Kit
The hardware store didn't have the .035 wall tubing, but the hobby store had tubing with a .049 wall. I got some and opened up 1" with a 7/64 drill for the cable and then used a 9/64 drill to open up 1/2 inch of that for the part that is tapped. After tapping it, I cut off the 1" piece, cleaned it out and glued it to the cable.
It looks like the slotted tips that I have will be too long to fit easily through the ejection port. Where can you get short ones? Is it feasible to cut one down to the length I need and then just thread what is left of the shank?
It looks like the slotted tips that I have will be too long to fit easily through the ejection port. Where can you get short ones? Is it feasible to cut one down to the length I need and then just thread what is left of the shank?
Shoot safely, shoot well, and shoot often.