Bullet casting bench (lots of pictures - updated 01/06/08)

Welcome to the Leverguns.Com Forum. This is a high-class place so act respectable. We discuss most anything here ... politely.

Moderators: AmBraCol, Hobie

Forum rules
Welcome to the Leverguns.Com General Discussions Forum. This is a high-class place so act respectable. We discuss most anything here other than politics... politely.

Please post political post in the new Politics forum.
Post Reply
User avatar
Ysabel Kid
Moderator
Posts: 27883
Joined: Mon Sep 17, 2007 7:10 pm
Location: South Carolina, USA
Contact:

Bullet casting bench (lots of pictures - updated 01/06/08)

Post by Ysabel Kid »

Well, with all the posts on the old forum about bullet casting, I’ve decided to get started. I used to cast blackpowder round ball and conical stuff 20+ years ago. Looking forward to getting into it and casting rounds for my cartridge firearms.

So, with that in mind, I needed to create a workspace. I asked a few months ago for some ideas, and here is what I came up with – my version of the portable casting bench. The idea is that this is something I’ll store in the basement and then roll out on the pad when I go to cast some bullets.

Image

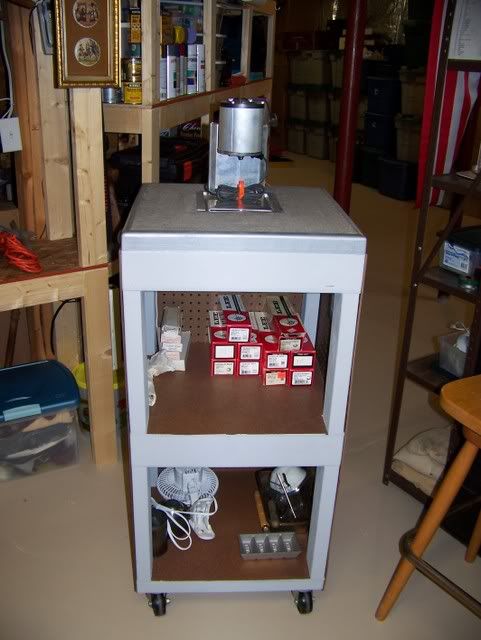
I would like to say that this was carefully considered, size wise, but I’d be fibbing. I made a 20-inch cube as a base for our Christmas tree this year, to try to give it some additional height (we now live in a house with a 2-story family room, so the tree looks short). Great idea – but it looked ridiculous! My wife nixed the idea as soon as we tried it. So, what to do with the cube? Well, I build another, a bit taller, as the base unit, and then mounted the cube on top of it. This became the two-shelf unit for storage.

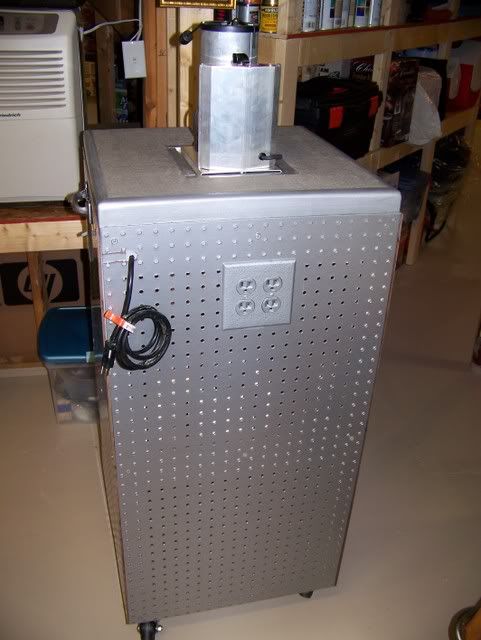
I then put casters on the bottom of the unit, wrapped the sides in pegboard, and built a frame for the top.

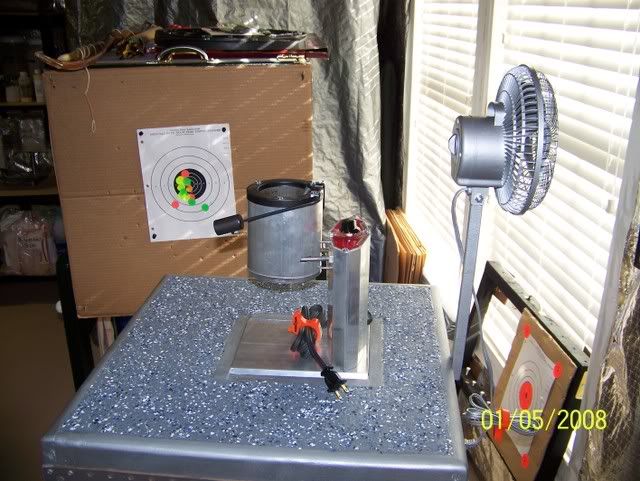
The top is concrete – I wanted a surface that would be fine with hot items. I am no mason – that’s for sure – but I think this will work out pretty well.

Image

Here’s a picture of the right side of the unit. I put a handle on this side and the opposite to help me lift the unit over the threshold in the basement door, and move it around.

Image

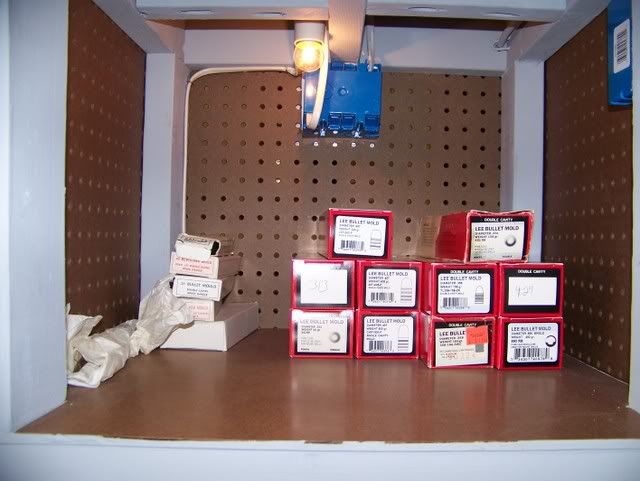
You’ll also notice the light switch. Well, that turns on the outlets I put in the back:

Image

And the small light I put above each shelf:

Image

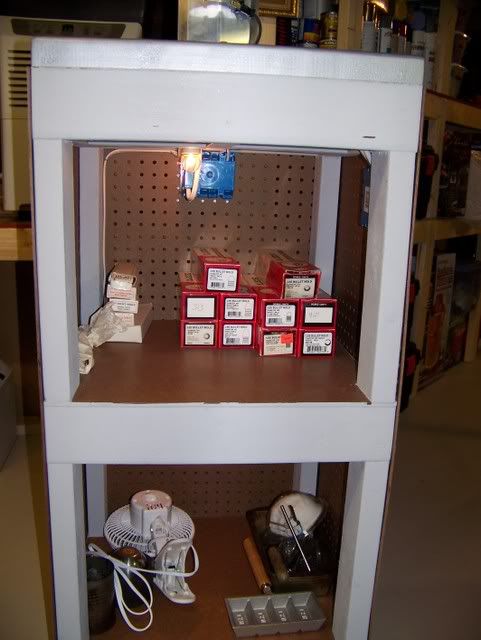
Easy enough to do and it makes finding things on the shelves very easy.

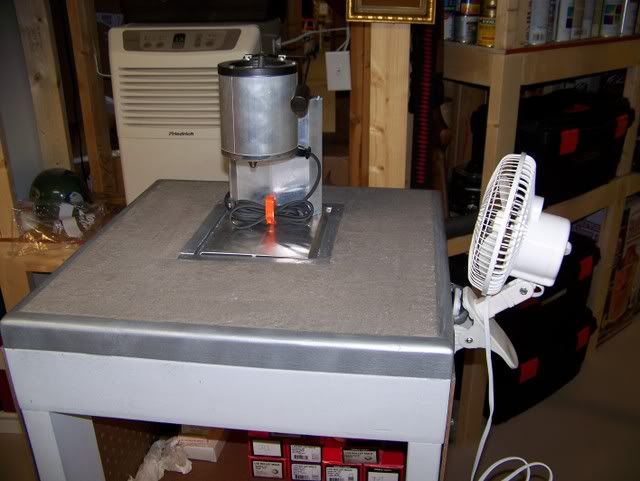
The outlet on the back is for the Lee Production Pot, a fan to blow the lead fumes away from me and a light if I need it. The black cord connects the casting bench to power.

Image

Well, what do you think? I have a few molds, but need to add some more. Need to get some lead and other things, then I can start! :D

Image
Last edited by Ysabel Kid on Sun Jan 06, 2008 11:51 pm, edited 1 time in total.
Image
homefront
Levergunner 3.0
Posts: 771
Joined: Tue Dec 18, 2007 10:01 pm
Location: Perkiomenville, Pa

Post by homefront »

Heck, you should market those!
rjohns94
Advanced Levergunner
Posts: 10820
Joined: Thu Sep 06, 2007 6:02 pm
Location: York, PA

YK

Post by rjohns94 »

Dude!!! perfect timing. I have been thinking about what I need to do for a set up for casting. I think Santa is bringing me a pot for Christmas. I have two sharps and some .44's to cast for. I love the cement top. Perfect! I like too the outlet, the switch and lights as well as the fan and ample storage.
Mike Johnson,

"Only those who will risk going too far, can possibly find out how far one can go." T.S. Eliot
LeverBob
Senior Levergunner
Posts: 1028
Joined: Mon Sep 03, 2007 7:14 pm
Location: Dayton, Nevada

Post by LeverBob »

Now, who's your daddy...definitely a hot setup. Nice & compact.

I'm wondering where's the coffee pot & toaster oven. Nuthin' like a ball park frank in a hot bun while your cookin' up some projectiles! Wash it down with a scalding hot cup of joe' !

Cookin' dogs & bullets...life is good!!

LeverBob
Great setup Kid! (By the way, don't eat & make bullets. Wash up real good before anything else...OK?)
Chuck 100 yd
Advanced Levergunner
Posts: 6972
Joined: Tue Apr 03, 2007 8:52 pm
Location: Ridgefield WA. USA

Post by Chuck 100 yd »

Very nice sabel.
When I cast some ingots out on the sidewalk once a few drops of lead hit the cement and were very hard to get up from the rough surface. But my shop floor is concrete and splatters dont even stick at all, its very smooth.
You may want to put some sealer on the concrete to keep it looking good.
Great idea!! :wink: Nice workmanship! :)
WCF3030
Senior Levergunner
Posts: 1244
Joined: Mon Sep 03, 2007 3:15 pm
Location: West Michigan
Contact:

Post by WCF3030 »

Very Nice!
That which does not kill me has made a grave tactical error.

http://thewoodsman1.blogspot.com/
User avatar
Griff
Posting leader...
Posts: 20860
Joined: Sat Mar 31, 2007 4:56 pm
Location: OH MY GAWD they installed a STOP light!!!

Post by Griff »

Nice setup.
Griff,
SASS/CMSA #93
NRA Patron
GUSA #93

There is a fine line between hobby & obsession!
AND... I'm over it!!
No I ain't ready, but let's do it anyway!
User avatar
handirifle
Senior Levergunner
Posts: 1146
Joined: Thu Sep 06, 2007 11:38 pm
Location: Central Coast of CA
Contact:

Post by handirifle »

I like it. I wonder about the fan being too close, might cool the molds too quickly. Other than that looks real good.
User avatar
marlinman93
Advanced Levergunner
Posts: 6480
Joined: Sun Apr 01, 2007 3:40 pm
Location: Oregon

Post by marlinman93 »

Looks great, and very nicely arranged! I wish I was that organized!
Pre WWI Marlins and Singleshot rifles!
http://members.tripod.com/~OregonArmsCollectors/
User avatar
JReed
Advanced Levergunner
Posts: 5509
Joined: Tue Apr 03, 2007 11:17 am
Location: SoCal

Post by JReed »

Me likes. Looks very well layed out and easy to get what you need like the lights.
Jeremy
GySgt USMC Ret

To err is human, To forgive is devine, Neither of which is Marine Corps policy
Semper Fidelis
spurgon
Levergunner 2.0
Posts: 155
Joined: Fri Sep 14, 2007 7:27 pm

Post by spurgon »

Ysabel Kid

Nice looking job. I'll try to start casting myself soon. I got 300 lbs of wheel

weights yesterday from my mechanic. A guy that I ran into at the gun shop

said that he would melt down his WWs over a wood fire between two cinder

blocks in a cast iron skillet. I guess such a skillet would be rendered

useless for food cooking after the fact. So I guess I'll get started that way

with a dedicated "smelting" skillet.

This fellow said that I should go with Lee melting furnace and a Lee Pro

4-20 and a Lee Lube and Sizing Kit. So that is my plan so far.

What's your plan Yasable?
spurgon
w30wcf
Senior Levergunner
Posts: 1358
Joined: Mon Apr 23, 2007 11:23 pm
Location: Erie, PA

Post by w30wcf »

Ysabel Kid,
Nice set up! :D

As you start casting, you may find that the pot would be better positioned more to the right to make more room for the bullets, as they accumulate on the left.

Have fuunnn!
w30wcf
aka John Kort
aka Jack Christian SASS 11993 "I can do all things through Christ who strengthens me." Philippians 4:13
aka w44wcf (black powder)
NRA Life member
.22 WCF, .30 WCF, .44 WCF Cartridge Historian
User avatar
2ndovc
Advanced Levergunner
Posts: 9349
Joined: Fri Sep 07, 2007 11:59 am
Location: OH, South Shore of Lake Erie

Post by 2ndovc »

Cool! That concrete top idea is brilliant!

I've got some odds and ends of stuff for casting butI haven't started yet either.

Think I'll print this one out. I was thinking of using an old metal file cabinet butI like this better.

8)
jasonB " Another Dirty Yankee"


" Tomorrow the sun will rise. Who knows what the tide could bring?"
User avatar
Modoc ED
Advanced Levergunner
Posts: 3332
Joined: Thu Sep 20, 2007 11:17 am
Location: Northeast CA (Alturas, CA)

Post by Modoc ED »

Very nice set-up. Did you pour the cement top or did you use a paving block or the like? I think the pegboard will come in handy so that you can hang tools off the side of the cart as you discover what's needed in the future. Well thought out and executed.
ED
Image
Yer never too old
User avatar
kimwcook
Advanced Levergunner
Posts: 7978
Joined: Tue Sep 04, 2007 10:01 pm
Location: Soap Lake, WA., U.S.A.

Post by kimwcook »

Good job. Let us know how she works.
Old Law Dawg
User avatar
steveb
Levergunner 2.0
Posts: 141
Joined: Thu Apr 05, 2007 12:27 pm
Location: The Great Midwest
Contact:

Post by steveb »

I cast on just about the same size setup with rollers as well. Yours is alot more fancy though. Good job! :)
User avatar
Ysabel Kid
Moderator
Posts: 27883
Joined: Mon Sep 17, 2007 7:10 pm
Location: South Carolina, USA
Contact:

Post by Ysabel Kid »

spurgon wrote:Ysabel Kid

Nice looking job. I'll try to start casting myself soon. I got 300 lbs of wheel

weights yesterday from my mechanic. A guy that I ran into at the gun shop

said that he would melt down his WWs over a wood fire between two cinder

blocks in a cast iron skillet. I guess such a skillet would be rendered

useless for food cooking after the fact. So I guess I'll get started that way

with a dedicated "smelting" skillet.

This fellow said that I should go with Lee melting furnace and a Lee Pro

4-20 and a Lee Lube and Sizing Kit. So that is my plan so far.

What's your plan Yasable?
spurgon
Pretty much the same as your plan - going with the Lee stuff. I just need to find a source for lead and WW that I can afford, and get started! :D
Image
User avatar
Ysabel Kid
Moderator
Posts: 27883
Joined: Mon Sep 17, 2007 7:10 pm
Location: South Carolina, USA
Contact:

Post by Ysabel Kid »

w30wcf wrote:Ysabel Kid,
Nice set up! :D

As you start casting, you may find that the pot would be better positioned more to the right to make more room for the bullets, as they accumulate on the left.

Have fuunnn!
w30wcf
I was think of adding removable side pieces on either the left or the right - depending on what I find I need after I get started. I can't move the pot, as the wood bracing is now surrounded by the concrete.
Image
User avatar
Ysabel Kid
Moderator
Posts: 27883
Joined: Mon Sep 17, 2007 7:10 pm
Location: South Carolina, USA
Contact:

Post by Ysabel Kid »

Modoc ED wrote:Very nice set-up. Did you pour the cement top or did you use a paving block or the like? I think the pegboard will come in handy so that you can hang tools off the side of the cart as you discover what's needed in the future. Well thought out and executed.
I poured it. That way I could work it around the inset for the pot, and make it level with the sides I had rounded over. I also considered tile, paving blocks, and cement backer-board. I think any of them would have worked fine, but a $3 bag of concrete sure did the trick! :wink:
Image
User avatar
Ysabel Kid
Moderator
Posts: 27883
Joined: Mon Sep 17, 2007 7:10 pm
Location: South Carolina, USA
Contact:

Post by Ysabel Kid »

handirifle wrote:I like it. I wonder about the fan being too close, might cool the molds too quickly. Other than that looks real good.
I will probably end up making an attachment for the fan. I haven't starting using the casting bench yet - just finished it, so I am sure I will discover a few things that work well, and some things that need modified. I'll be sure to let everyone know! :D
Image
User avatar
Ysabel Kid
Moderator
Posts: 27883
Joined: Mon Sep 17, 2007 7:10 pm
Location: South Carolina, USA
Contact:

Post by Ysabel Kid »

Chuck 100 yd wrote:Very nice sabel.
When I cast some ingots out on the sidewalk once a few drops of lead hit the cement and were very hard to get up from the rough surface. But my shop floor is concrete and splatters dont even stick at all, its very smooth.
You may want to put some sealer on the concrete to keep it looking good.
Great idea!! :wink: Nice workmanship! :)
Thanks! My thoughts exactly on the sealer. I don't want to make it too pretty though - I intend to use it, hopefully a lot!!! :wink:
Image
User avatar
J Miller
Member Emeritus
Posts: 14885
Joined: Sat Mar 31, 2007 7:46 pm
Location: Not in IL no more ... :)

Post by J Miller »

Nice set up. I like it.

My cats would find those three sided closed in but well ventilated shelves irresistible for naps.

Put the fan at the back facing away from you and use it as an exhaust fan.
It will pull the fumes away without cooling down your pot or molds.

Joe
***Be sneaky, get closer, bust the cap on him when you can put the ball where it counts ;) .***
HEAD0001
Levergunner 3.0
Posts: 659
Joined: Tue Sep 18, 2007 11:59 pm
Location: RIVESVILLE, WV

Fly in the Ointment

Post by HEAD0001 »

Good looking rig. Please accept my apology first, but I see some burns in your future.

Do the caster's have wheel lock's on them??

Is there a permanent table some where that you could C-Clamp your portable table to while you cast???

The table looks top heavy???

Please, Please do not see my comments as negative. Please see my comments as a friend who has been BURNED.

Set the fan to draw air off the pot, not to blow across. Tom
User avatar
Ysabel Kid
Moderator
Posts: 27883
Joined: Mon Sep 17, 2007 7:10 pm
Location: South Carolina, USA
Contact:

Re: Fly in the Ointment

Post by Ysabel Kid »

HEAD0001 wrote:Good looking rig. Please accept my apology first, but I see some burns in your future.

Do the caster's have wheel lock's on them??

Is there a permanent table some where that you could C-Clamp your portable table to while you cast???

The table looks top heavy???

Please, Please do not see my comments as negative. Please see my comments as a friend who has been BURNED.

Set the fan to draw air off the pot, not to blow across. Tom
Junior had recommended locking casters. Being too cheap to buy a set when I had a good set of locking casters, I just made a stop. Looks like a picture frame - I push the cart into it, and there it stays until I lift it out. Simple solution - especially when you have wood lying around!

It actually isn't top heavy that much. I plan to store some of my lead in the bottom shelf too, just to give it more balance.

I like the exhaust fan idea - that is what I will do! Thanks guys!!! :D
Image
User avatar
Hobie
Moderator
Posts: 13902
Joined: Sat Mar 31, 2007 1:54 pm
Location: Staunton, VA, USA
Contact:

Post by Hobie »

That is just wicked cool! 8) :mrgreen:

Right now I'm casting on a 1/2" plywood board clamped to top of my Workmate.
Sincerely,

Hobie

"We are all travelers in the wilderness of this world, and the best that we find in our travels is an honest friend." Robert Louis Stevenson
dr walker
Senior Levergunner
Posts: 1194
Joined: Wed Sep 19, 2007 9:44 am
Location: southwest Florida

Post by dr walker »

Good looking bench, I have made similar benches for router tables and chop saw tables. I never thought about a poured concrete top, that is great. I feel a new project coming on...
spurgon
Levergunner 2.0
Posts: 155
Joined: Fri Sep 14, 2007 7:27 pm

Post by spurgon »

J Miller,

Is Yasable's fan in the picture big enough to do the job. I'm scared to death

of the lead fumes. Horror storied abound.

spurgon
Junior
Levergunner 2.0
Posts: 171
Joined: Tue Apr 24, 2007 11:19 am
Location: North Louisiana
Contact:

Post by Junior »

spurgon wrote:J Miller,

Is Yasable's fan in the picture big enough to do the job. I'm scared to death

of the lead fumes. Horror storied abound.

spurgon
It's plenty big enough. All you need is an air current headed away from your face.
User avatar
Ysabel Kid
Moderator
Posts: 27883
Joined: Mon Sep 17, 2007 7:10 pm
Location: South Carolina, USA
Contact:

Post by Ysabel Kid »

Junior wrote:
spurgon wrote:J Miller,

Is Yasable's fan in the picture big enough to do the job. I'm scared to death

of the lead fumes. Horror storied abound.

spurgon
It's plenty big enough. All you need is an air current headed away from your face.
Thanks Junior - I had wondered about that myself! :shock:
Image
Ben_Rumson
Advanced Levergunner
Posts: 2569
Joined: Sat Sep 15, 2007 12:51 pm

Post by Ben_Rumson »

Nice looking rig...Should the concrete turn out to be a problem, perhaps a large size aluminum cookie sheet would fit the bill..Give you a nice lip to keep things from running off, should disaster strike..
User avatar
Ysabel Kid
Moderator
Posts: 27883
Joined: Mon Sep 17, 2007 7:10 pm
Location: South Carolina, USA
Contact:

Post by Ysabel Kid »

Took everyone's advice and finished off the casting bench over the weekend.

I mounted the fan - with it sucking the fumes away and out the back.

I sealed the concrete top - and even embedded some paint chips left over from doing my garage floor a few years ago.

Image
Image
Image

Thanks guys!
Image
Travis Morgan
Senior Levergunner
Posts: 1581
Joined: Sun Dec 30, 2007 6:59 pm
Contact:

Post by Travis Morgan »

darn nice. All ya need is a dedicated set of gloves and safety goggles and a fire extinguisher. A leather apron wouldn't be so bad, either.
Hunter Ed. instructor
NRA Basic pistol Inst.
NRA Personal protection inst.
NRA Range safety officer


Blessed is the man that walketh not in the counsel of the ungodly, nor standeth in the way of sinners, nor sitteth in the seat of the scornful. But his delight is in the law of the LORD; and in his law doth he meditate day and night. Psalm 1
spurgon
Levergunner 2.0
Posts: 155
Joined: Fri Sep 14, 2007 7:27 pm

Post by spurgon »

Ttop drawer. No you don't need one. I should have said outstanding.
spurgon
User avatar
RIHMFIRE
Advanced Levergunner
Posts: 7650
Joined: Fri Sep 07, 2007 11:51 am
Location: Florida

Post by RIHMFIRE »

Thats real slick...I like it!
But I hope you wheel it outside...when you start.
Good ventilation is a must...
User avatar
Ysabel Kid
Moderator
Posts: 27883
Joined: Mon Sep 17, 2007 7:10 pm
Location: South Carolina, USA
Contact:

Post by Ysabel Kid »

RIHMFIRE wrote:Thats real slick...I like it!
But I hope you wheel it outside...when you start.
Good ventilation is a must...
That's why I made it like that. It will go right out the basement door (it is a walk-out), and onto the pad. Electrical outlet is right beside the door. I can't wait to get started!!! :D
Image
Post Reply